How to Edit a PDF on Mac: 6 Best Methods You Should Know
Learn how to edit a PDF on Mac to avoid the hassles of printing out a PDF application form, filling it up by hand, and scanning the document to submit to the recipient.
PDF is the most widely used digital document. It opens easily using the built-in apps of a computer, mobile phone, or tablet. Also, it reads similarly on any of these devices. Thus, whether you go to apply for a job, passport, state ID, driving license, or submit tax returns, you must fill up a PDF application form.
You don’t need a printer, pen, and scanner to submit the application if you’re sitting in front of your MacBook or iMac. Learn how to edit a PDF on Mac for free or for a small fee by applying the following methods:
- How to Edit a PDF on Mac With Preview
- How to Edit a PDF on Mac With Quick Look
- How to Edit a PDF on Mac Using Google Docs
- How to Edit a PDF on Mac Using Microsoft Word
- How to Edit a PDF on Mac on Adobe Acrobat Online
- How to Edit a PDF on Mac Using Third-Party Apps
- Conclusion
How to Edit a PDF on Mac With Preview
There’s no need to spend a dime if you know how to use the Preview app of Mac to edit PDF files. The tool offers the following functionalities:
- Select text copy content
- Select an image using a rectangular selection to erase it or copy it
- Add texts to a PDF application form
- Sketch, draw, and e-signature functionalities
- Highlight content, and leave comments for collaborative document editing
- Add notes to a PDF
- Re-arrange pages of a PDF
- Delete pages from a PDF
- Add images, shapes, and photographs to a PDF
You can do almost all sorts of PDF editing tasks on the Preview app except editing the content using the exact typeface. If you’re only looking for the above-mentioned PDF editing functionalities without the need for text editing, the Preview app is sufficient for you.
Find below some simple steps to edit a PDF on Mac for free:

- Open the folder that contains the PDF file you want to edit.
- Double-click the PDF file to open the file in the Preview app.
- The Show Markup Toolbar won’t be visible when you open a PDF file. It’s the default behavior of the Preview tool. You must activate the markup tool first.
- There are three ways to activate the markup or annotation tool on the Preview app. These are:
- Click the View menu on the Mac toolbar for the Preview app and click the Show Markup Toolbar option from the context menu.
- Hit the keyboard hotkeys Shift + Command + A simultaneously.
- On the Preview app itself, click the Show Markup Toolbar on the top-right corner of the app, just to the left of the Search box.
Now you got the markup or annotation tool on the Preview app. Let’s explore various editing functionalities of this PDF editor for Mac:
- Click the Text Selection button on the markup toolbar and then select any text on the PDF file to copy, search the selection online, or translate.
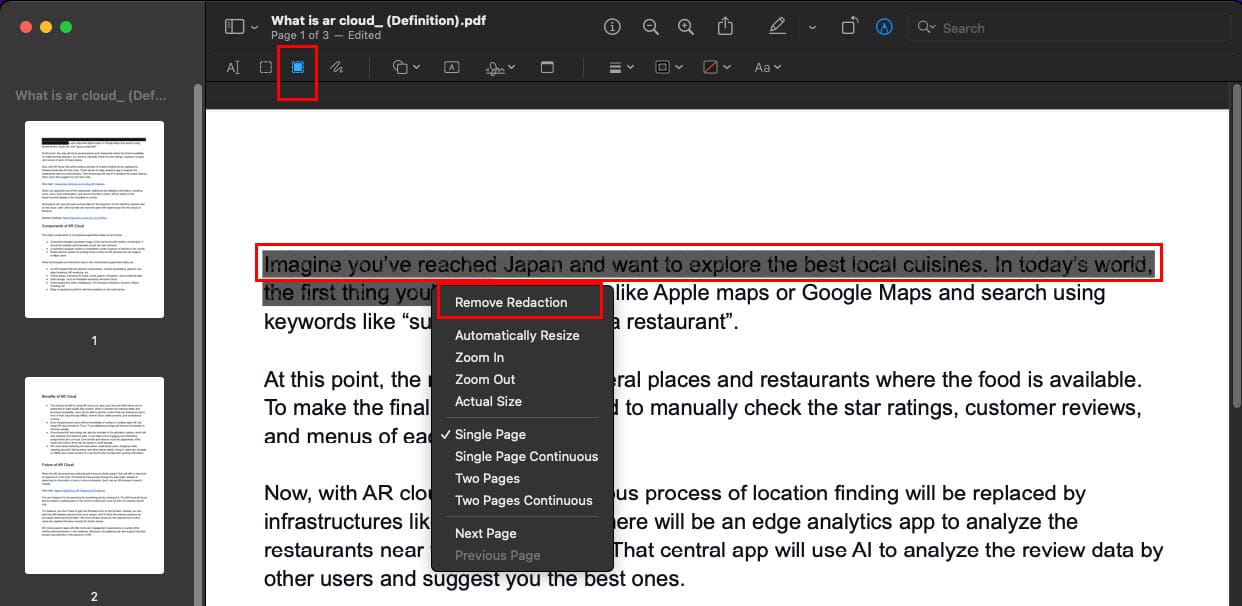
- Select the Redact feature on the app to obscure or censor texts, images, signatures, tables, etc., on the PDF.
- The Redact feature is a permanent change. So don’t close the PDF after selecting a text for redaction until you’re absolutely sure of the action.
- To remove the redaction you didn’t save yet, right-click on the redacted text and select Remove Redaction.
- Just to the right of the Redact function, you get the tool to draw freehand art on the PDF. Select Sketch and start drawing annotations on the PDF. The AI processing of the Preview app refines your drawing to the nearest possible graphic. You can choose from such suggestions or keep your own sketch.
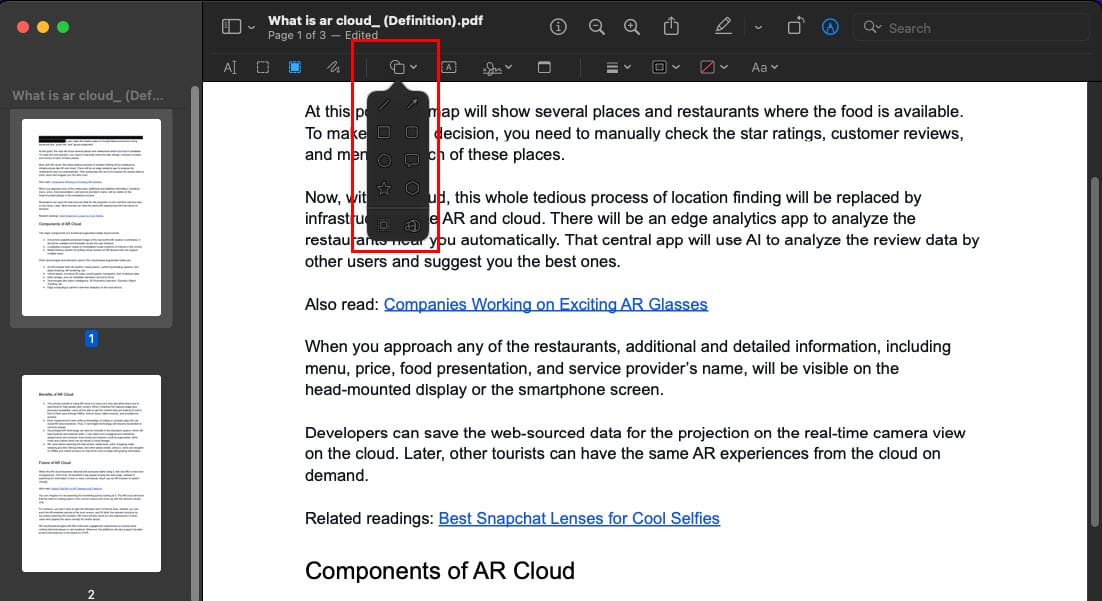
- Click the Shape tool to add various shapes to annotate the document. Default shapes are arrows, geometric shapes, etc. At the bottom of the Shapes context menu, there’s a magnification tool. Use it to magnify a circular portion of the document.
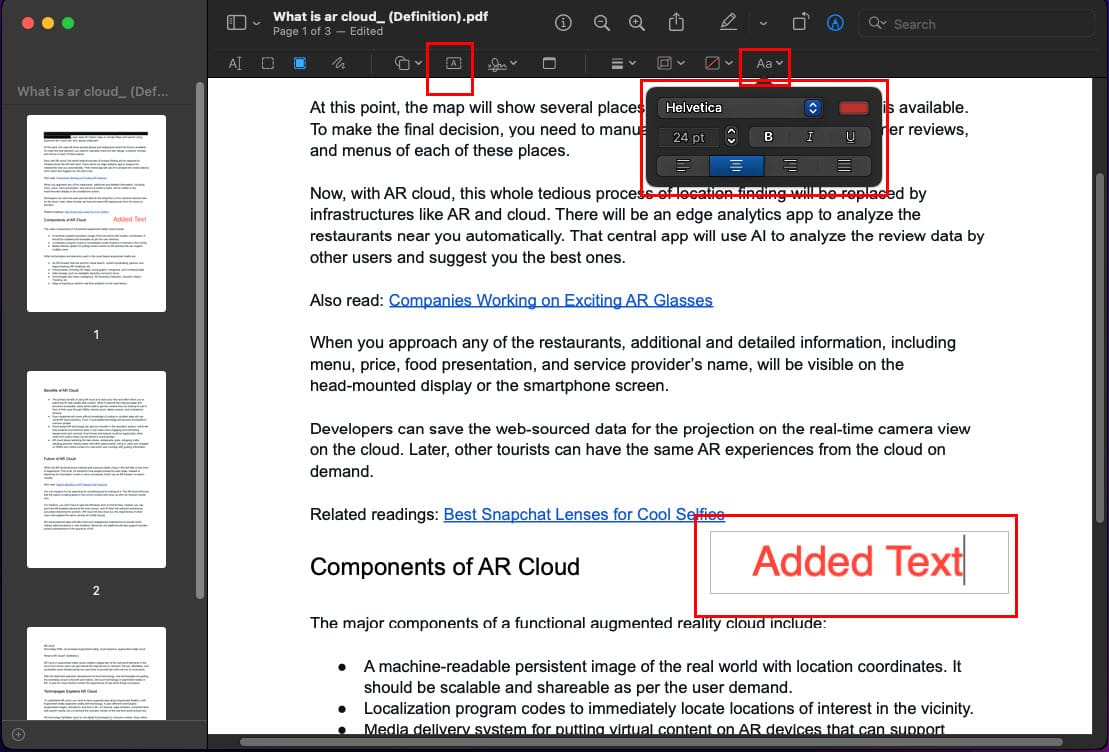
- To add text to a PDF document, simply click the button with the letter A surrounded by a box. To customize text formatting, click the Text style tool at the end of the markup toolbar of the Preview app.
- You can use the Sign tool to add hand-drawn signatures on a PDF. However, the Sign tool will only work in the presence of a webcam and a trackpad.
So this is how to edit a PDF on Mac for free using the Preview app. If you’re looking for minimal edits quickly, then you may want to try out the Quick Look app of macOS.
How to Edit a PDF on Mac With Quick Look
Quick Look gives you an instant view of a file in the Finder app without opening the file using its dedicated macOS application. It supports numerous file types including PDFs. So, you can take a quick peek into a PDF file using this awesome tool on your MacBook or iMac. That’s not all! You can even edit PDF files using the Quick Look app. Here’s how it’s done:
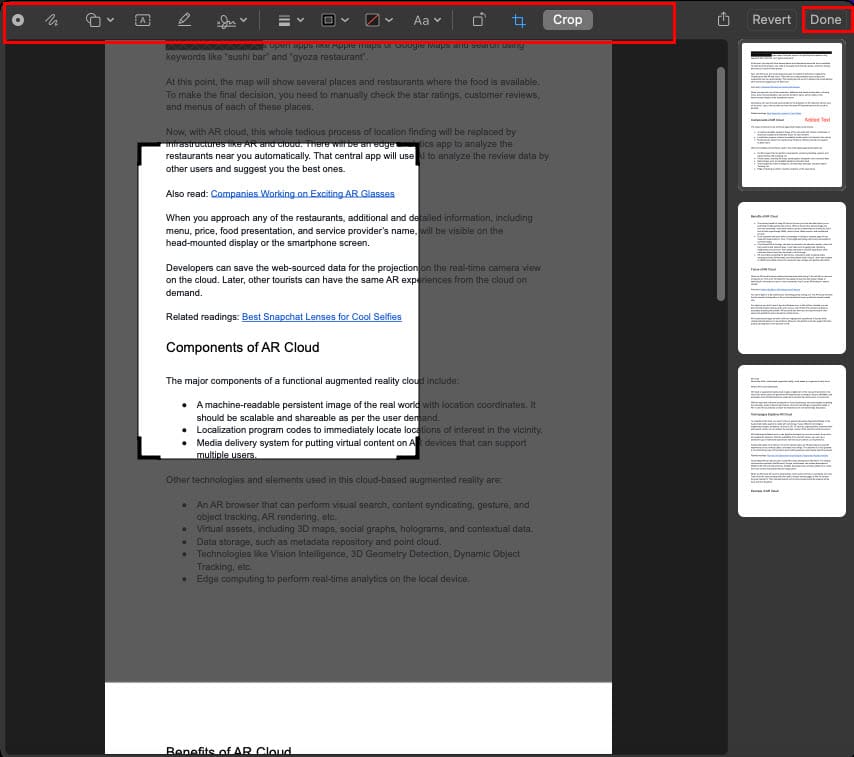
- First off, you must know how to view a file in the Quick Look tool. Open the PDF file’s folder. Select the file using a left-click and hit the Space Bar on the keyboard. This should open a small preview of the file’s content. Wonderful! You successfully opened Quick Look.
- Just like the Preview app, you won’t see any PDF editing feature after opening the file in Quick Look.
- Find the Show Markup Toolbar option near the Share button in the top right corner of the Quick Look app. Click the Show Markup Toolbar once to get the PDF editing features.
- Most of the content editing and annotating tools are similar to that of the Preview app. Except, you won’t find Redact feature in Quick Look.
- The added advantage of this PDF editor for Mac is you can crop your PDF just like an image using the Crop tool.
- To apply the changes made to the PDF file before closing it, you must click the Done button on the top right corner of the Quick Look app interface.
Now you know the PDF editing features available on macOS. If you need some different features than these, you must try the following methods:
How to Edit a PDF on Mac Using Google Docs
Suppose you created a PDF contract for a client. The client spotted an anomaly and asked for a revised contract. You can either go back to the original file created on Microsoft Word or Google Docs to edit the content. That might be time-consuming though. The best option is to edit the PDF file using Google Docs directly. Find out the effortless steps below:
- Upload your PDF file to your Google Drive storage.
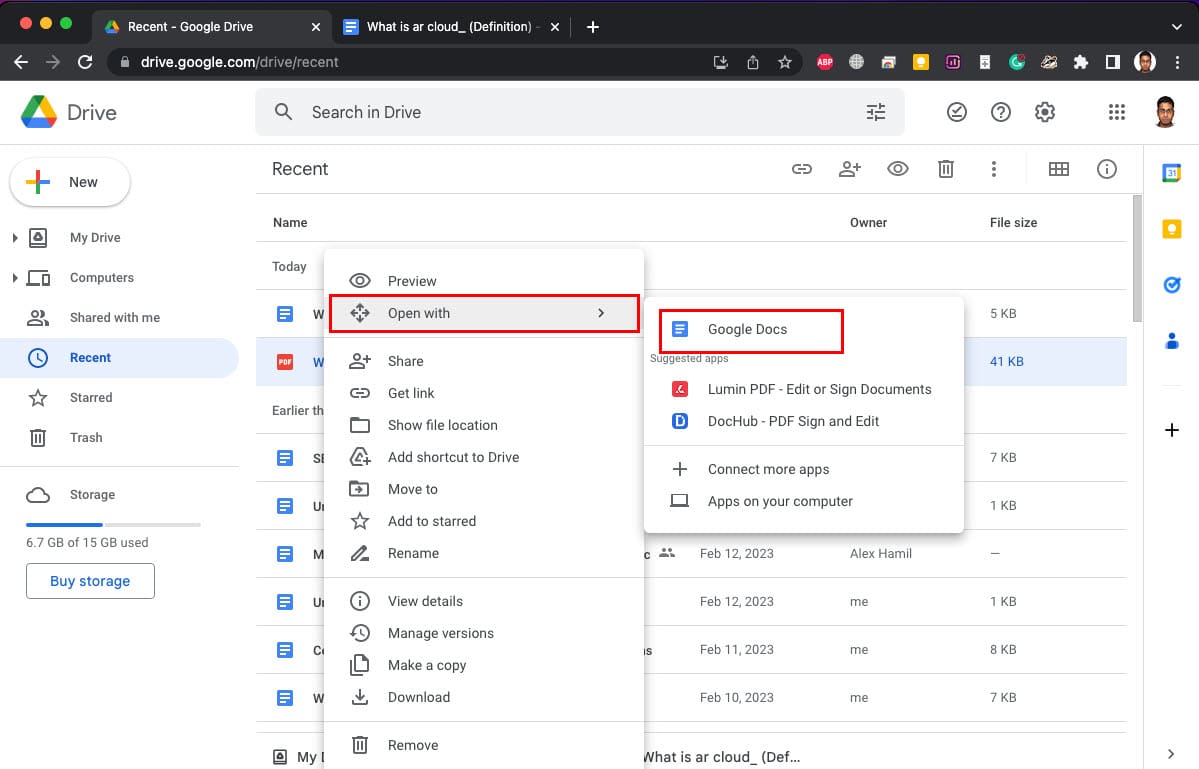
- Now, select the PDF file on Google Drive, right-click, and choose Open with Google Docs.
- Google Docs will scan the PDF for content and create an editable Google Docs file.
- Now, you can do whatever Google Docs allows like add new text, omit existing texts, edit images, and numerous other things.
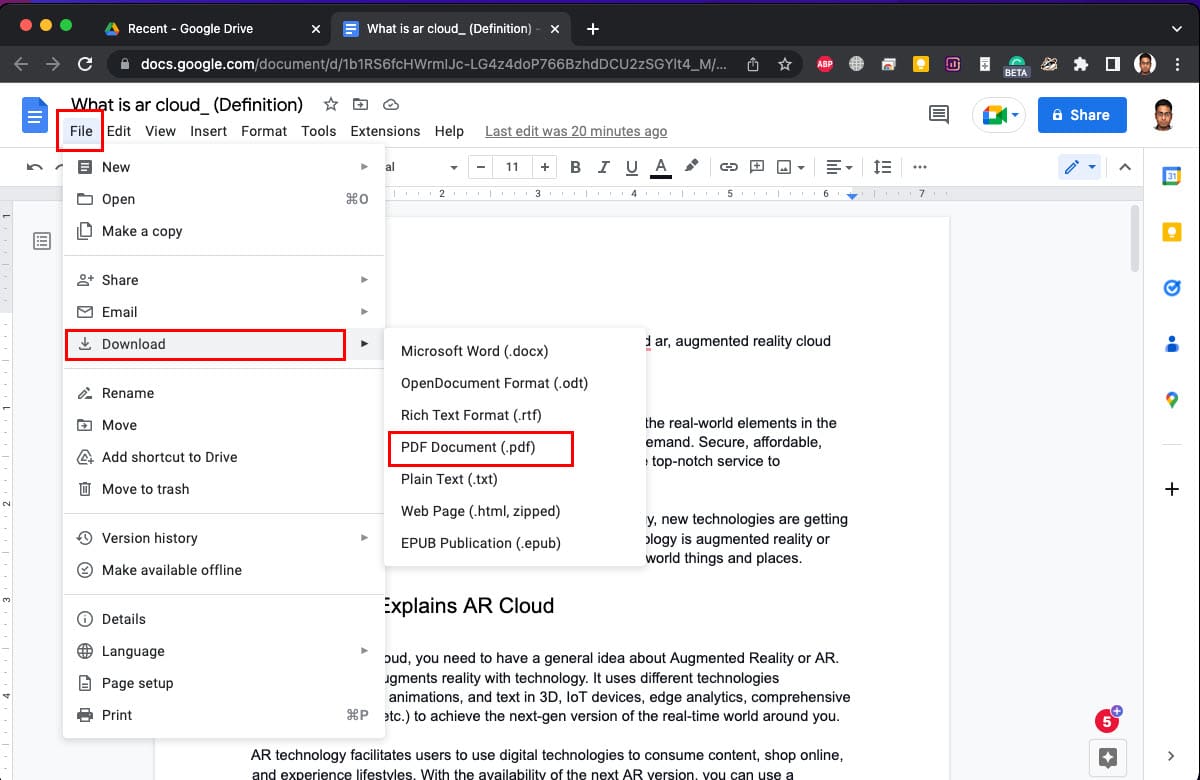
- Once you’re done editing the document, click File on Google Docs, hover the cursor over Download, and get a PDF copy on your local storage.
- Email the revised PDF contract as an attachment to the client.
How to Edit a PDF on Mac Using Microsoft Word
You can also edit a PDF on Mac using the Word app for Mac. This would only work with PDFs created from word processing apps like Google Docs, Word, Libre Office, etc. Any PDF created using a scanning device may not open as text content inside Word. Currently, Word doesn’t process uneditable images through optical character recognition (OCR) software. Here’s how you can edit PDF using Word:
- Go to the folder that contains the PDF file to be edited.
- Open the Word app from Dock. Alternatively, you can search and open the app using Spotlight Search.
- When the Word app is open, minimize its window if it opened in full-screen mode.
- Create a blank Word file.
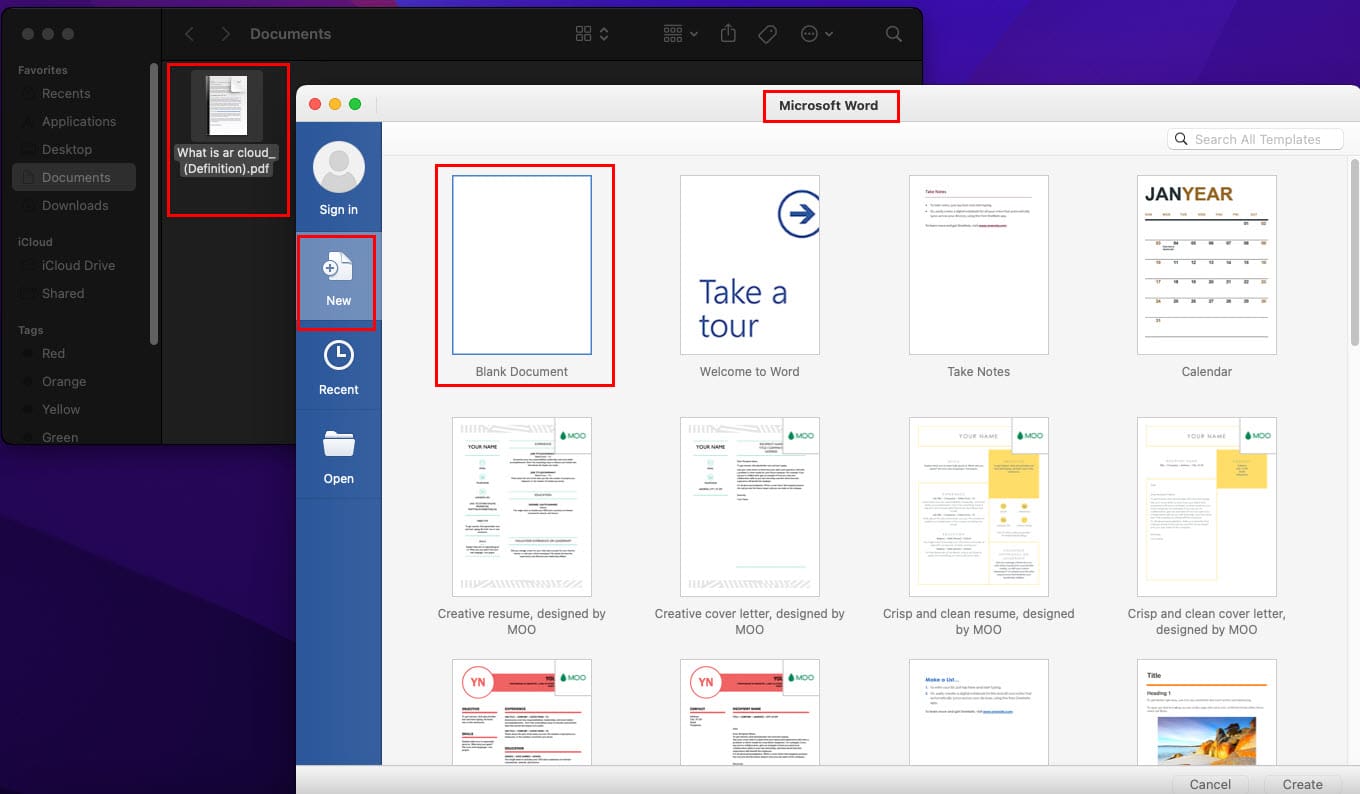
- Now, simply drag and drop the PDF file from its folder on to blank Word file.
- It should process the content and show up editable texts inside the Word app.
- Now, you can freely use all the text formatting and writing tools of Microsoft Word.
- When you’re finished editing the document, click the Save button on the Word app.
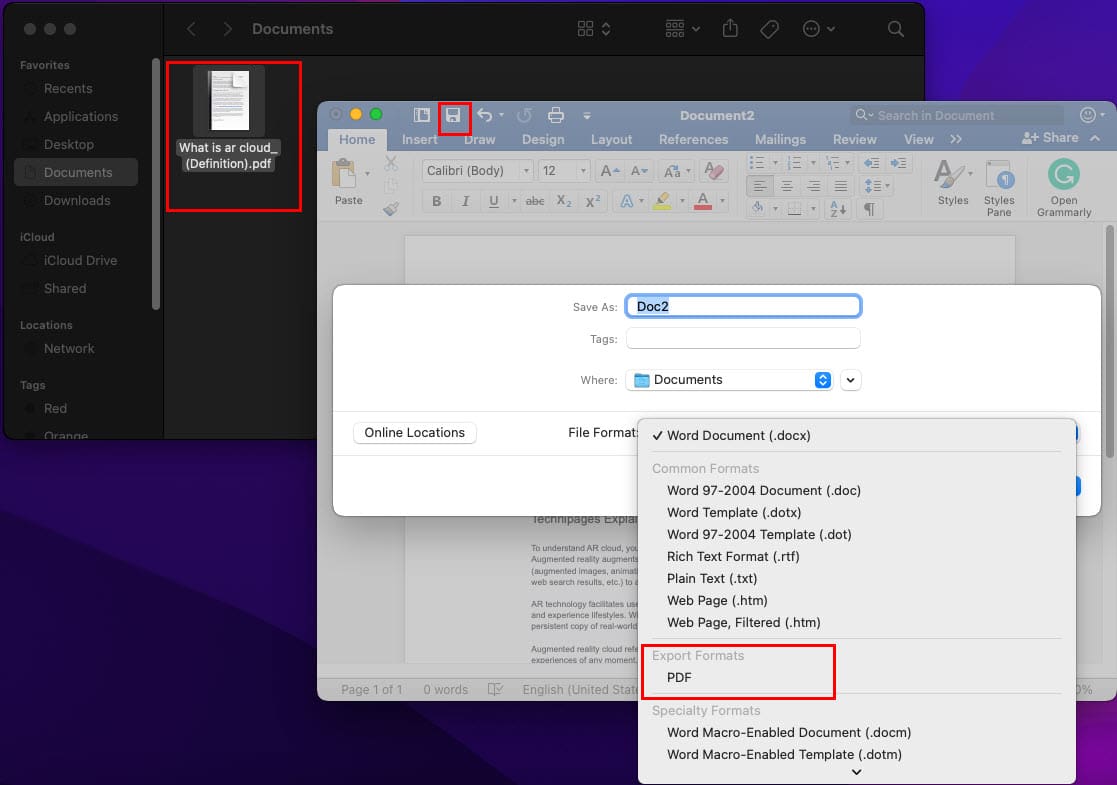
- Click the drop-down arrow in the File Format box.
- There, you should see PDF as an option, Click on it.
- Click Export to save the Word file as PDF.
- Now you can email it, WhatsApp it, or text it using iPhone or iPad.
How to Edit a PDF on Mac on Adobe Acrobat Online
If you need more features than Preview, Quick Look, Google Docs, and MS Word, you can give the online PDF editor of Adobe Acrobat a try. Here’s how to use Adobe Acrobat Online on Mac:
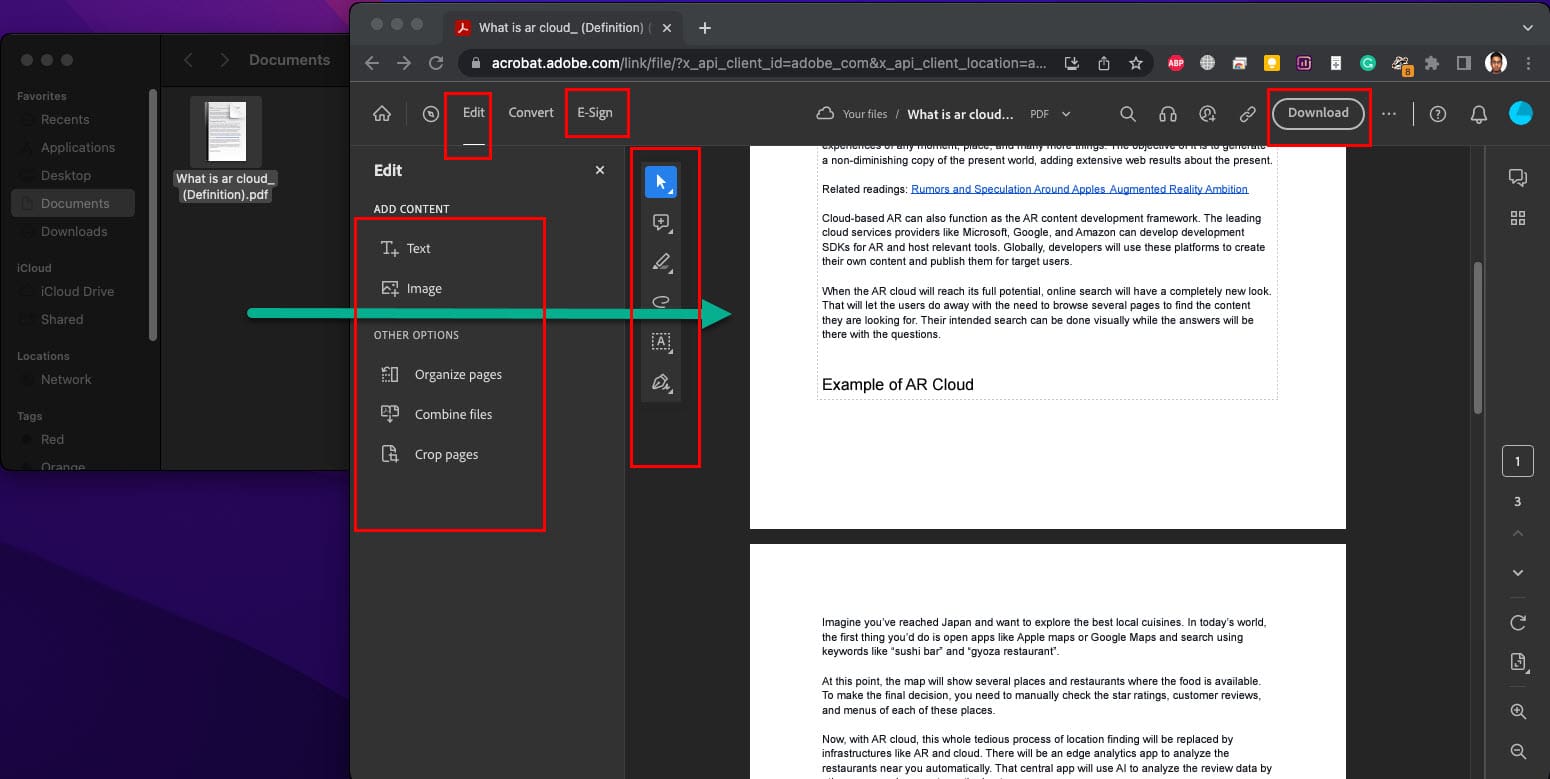
- Open Safari and visit the Adobe Acrobat PDF Editor portal.
- Drag and drop the PDF file inside the box below the Edit a PDF heading.
- Adobe Acrobat will ask you to log in using a Google or Adobe account.
- Once you log in successfully, the cloud-based PDF editing tool will open up.
- There, you can use various markup and annotation tools after selecting the Edit tool on the top toolbar.
- When you’re done editing the document, click the Download button to get a PDF copy of the modified file.
- The tool may ask you to get a trial or paid subscription depending on your country and region.
These were some pretty good ways to edit a PDF on Mac. However, the App Store is flooded with native macOS applications to edit PDF documents.
How to Edit a PDF on Mac Using Third-Party Apps
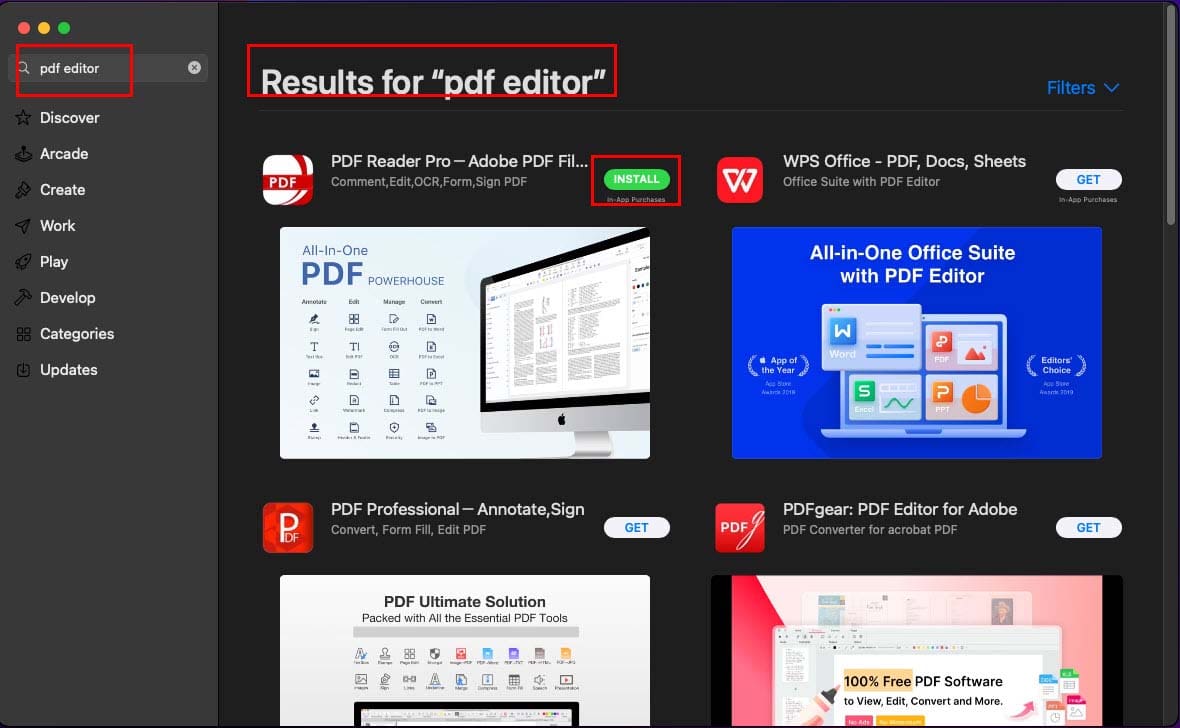
- Open the App Store on your MacBook or iMac.
- In the search box, type PDF Editor and hit Return.
- You’ll see many options for native PDF editors for MacBook and iMac.
- Choose one by evaluating ranking, reviews, pricing, and PDF editing features.
- Click Get and then select Install to start downloading and installing the PDF editor on your device.
- You may need to authenticate the app installation by signing in to your Apple ID.
Conclusion
Now you know how to edit a PDF on Mac using free and paid tools. You can give any of the above methods a try depending on your PDF editing needs. Don’t forget to comment below if you know of any other effortless ways to edit PDF on macOS devices like iMac and MacBook.
If you’re into writing, editing, and content creation business, you must also read how to add Grammarly to Word on Mac.


